On Sunday September 5th 2010, after building exactly seven years and 51 weeks: the time had come to test the V8 on asphalt. The thrill is hard to describe but I'll try anyway.


But first of all I'll picture the nine months since the last V8 update (November 2009). This report is quite extensive but still it's no more than an impression of all the work.

For example: this is a part of the rear brake system: I cut out a piece from a thick steel plate ...


... which I milled to form a T-bar.


    With my dividing attachment a milled appropriate holes and curves.  


The production of one-off auxilary tools and the exact positioning takes 90% of the time.


But the result was rewarding.


Both rear brake cylinders* originate from a CBR600RR and must be connected.

* in the rear rim I mounted two brake discs, each with a six caliper brake unit; I prefer stopping this 1000 lbs bike with good brakes. ;)


Before you realize it, two long evenings are spent.


  I milled a slot in both lids ...  


... in which I clamped a tube ...


... and then silverwelded it.


Even the brake cylinders were modified.


    Finally I made a connecting rod for the brake fluid.  


This is the result.


  As so often, most of the work remains unseen. But that doesn't really matter: the challenge is designing and creating, and if it turnes out to be functional, that is very rewarding.  
       
    Talking about challenges: The Clutch. The easiest solution would be to put in a Boss Hoss transmission but that wouldn't be fun, would it? After long discussions with Klaus I went looking for a lock-up clutch. I met Danny Bellio, a Belgian dragracer.  
       
 
  He sold me (correction: he almost gave me) a clutch of a 4000 hp methanol dragster.  


An impressive unit. The principle is like this: the six arms move outwards by centrifugal force as the engine revs up, thereby pressing the clutch plate until it stoppes slipping. The more revs, the firmer the clutches grip.


    The whole unit weighs about 56 lbs. Not exactly light but who cares with such a project.  


I didn't want to depend just on the revs to drive off. So I designed a hydraulic pressure group in 3D Studio Max in which three hand-operated plungers press the clutch plate. This way I can accelerate at lower revs; at higher revs the arms take over.


In CorelDraw I made a drawing and a action plan of all the production steps; just one mistake in the sequence, one miscalculation, and I could have started all over. And I do not like that: if possible measure twice, produce once.


    Drilling, sawing ...  
       
    ... lathing notches for the big Viton O ring seals ...  
       
    ... some more notches with the dividing attachment ...  
       
    ... with a one-off prepared cutter for the smaller O ring seals.  
       
    I decided to fabricate the part in which the plungers move from stainless steel.  
       
    Starting with a stainless steel disc: 12cm diameter, a height of 7cm and a weight of 7 kilo.  
       
    Lathing ...  
       
    ... adding holes ...  
       
    ... even more lathing ...  
       
    ... and back to the dividing attachment. Thorough preparation again payed out. But still it took a huge amount of time.  
       
    Later I pressed bronze bearings in the stainless part (top left) to smoothen the movement of the plungers (middle right).  
       
    On the left you see the (also modified) thrust bearing. And you can see the hollow grub screw which leads to the clutch handle, and the venting nipple.  
       
    Ready for testing. A nice idea doesn't automaticly mean it does its jobs properly. Reality is sometimes cruel.  


Voor het weergeven van de inhoud op deze pagina is een nieuwe versie van Adobe Flash Player vereist.

Adobe Flash Player ophalen


Together the three 10mm plungers pressed no less then 280 lbs.

Press the play-button to start the movie.


A company called Goedhals produced the so called 'prie axle'*, based on a drawing by Klaus. This is Gerard Willemse, he's into dragracing as well.

* not too sure about this translation...


    This axle puts the engine's power via the bevel gear drive to the front sprocket.  


Voor het weergeven van de inhoud op deze pagina is een nieuwe versie van Adobe Flash Player vereist.

Adobe Flash Player ophalen


Built-in it looks like this: on the left you see the clutch, on its right the hydraulic pressure group, then the bevel gear drive and finally the front sprocket. All of these will be hidden behind metal sheets for safety. A pity I think.

Press the play-button to view the movie.


    Another modification, this time a close-up from the throttle body: two throttle cables and an idle adjusting screw. What you see is 5 by 5 cm: it couldn't be more compact.  


Let's take a brief look in the gas tank, in which I made a lot of changes: two Walbro fuel pumps* with four fuel filters and hoses for returned fuel and venting. The complete construction is bolted as lid to the bottom of the gas tank. Never to see daylight again. I hope.

* these fuel pumps deliver 255 liters per hour each; at full throttle a V8 is very thirsty.


    Here you look inside the bottom of the tank itself. You see the tubes through which the NOS hoses will go, and two hoses through which the electrics from both horns go.  
       
    A diagram showing the fuel injection system: two fuel pumps, a pressure regulator and sixteen injectors. Eight for normal use, eight big ones if the engine really has to deliver. In these situations the second fuel pump comes in.  
       
 
  The air system is no less complex: both turbos put pressure on the intake manifold. The MegaSquirt computersystem, both wastegates an blow-offs regulate that pressure.  
       
 
  Finally a NOS system: four solenoids, six nozzles and two bottles with HiFlow valves will give the engine a final boost.  
       
 
  A killswitch is a switch on the handle bars which is connected to the biker (me, in this case): if you fall off the engine will automatically stop. Designing a compact and reliable killswitch wasn't easy: many designs didn't make it.  
       
    The design from the turn signal indicators ...  
       
    ... somewhat looks like the ones on the CBX.  
       
 
  By the way: did I mention Niels already? I think not so it's about time. On the left you see his multiannual project: an entirely self-built two meter high CNC mill. An incredible complex and accurate machine.  
       
 
  Despite that he offered five saturdays to pull wires, solder, tune and curse once a while. Sometimes because of (at first) inexplicable problems, sometimes because of the cold; last winter was a very cold one.  
       
    Technically this is way beyond my league. De electronics will calm the uncontrollable raging bull to a manageable bull.  
       
 
  Together with Frans (on his right) wire after wire was connected and tested. On the bottom part of the picture you see a giant magnifying glass.  
       
    If you see this, you'll understand the necessity of the magnifier. The fact that there's very little space to put all the electrics (what's new?) didn't ease the job.  
       
    This is the most extensive application of the MegaSquirt motor management system ever. Even the manufacturer benefits from this groundbreaking project because Niels occasionally detects a design error, and finds a cure.  
       
 
  Soundness is paramount: regular plugs do not suffice.  
       
    The speedometer was connected to the computer and the vast amount of sensors.  


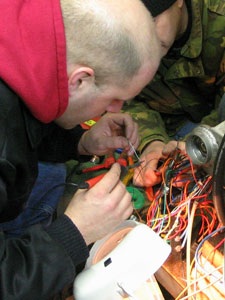
I made a setup to test the trigger wheel and its sensor. The wheel's pulses (36 teeth minus 1) control the ignition of the bike.


  Testing at a drill setup turned out to be easier than testing at a running engine.  
       
    Then I designed a mount for the sensor ...  


... first in 3D Studio Max, and then in aluminum. I can adjust the height of the sensor relative to the trigger wheel and also adjust it along the slit.


    This picture shows you the back side of the engine; on the left you see the trigger wheel sensor, on the right the oil pressure sensor.  


Niels wasn't the only one working on the electronics. Dr. Ir. Benno Krabbenborg and me are friends since we were born and, thirty years after our Lego Technic era, we developed all the V8's non-motormanagement electronics: the lights. As a decent Dr. Ir. (in real life he designs computer chips) suits, everything was first designed and simulated on the computer.

Click the image to enlarge it.


    I worked out the schedules in CorelDraw and had the etching and drilling done by Technojunk: fast, affordable and high-pitched.  
       
    I soldered all wires, chips, capacitors, resistors, transistors and diodes.  
       
    Then we tested all connections with a battery, a multimeter and a light bulb. This work is still in progress.  


The oilpan turned out to be a time-consuming and costly setback. It was completely hand crafted from stainless steel. The many welds distorted the integrety so much it wasn't possible to fix it: each new weld would further deteriorate the pan. At such times I hate stainless steel.


    So I took a deep deep breath and started a completely new oilpan, this time of aluminum: a sheet, two butt straps and a solid block were the ingredients. At the top you see the 'old' oilpan.  


I milled the straps so that they formed the edges of the new oilpan.


    The milling of the solid block took a lot of time.  
       
    Never before was my workshop so filled with aluminum chips.  
       
    Klaus welded the parts professionally. That's important because any spilled oil would stick immediately to my rear tyre.  


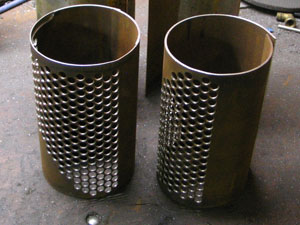
While testing the engine it was soon evident that it produces a lot of heat. And because I am, unlike a Boss Hoss, posititioned over the engine instead of behind it, I had to find a way not to be roasted. So I designed heat shields for the valve covers and exhausts. First in 3D, then 2D ...


... followed by perforation 'by hand'. A highly concentrated activity during which you can't afford any calculation error.


    Folding ...  
       
 
  ... and welding.  
       
    The silencers got their own shields. No pictures of the mounted shields, this would reveal too much.  


Anyway: welll-spent nine months. On a sunny Sunday, September 5th 2010, the supreme moment had come: the first test outside, for the first time on the road, for the first ride. This also required a decent preparation. I had my trailer equipped with a hood because I did not want any snoops. Frans and Niels checked if the tyres were properly inflated at a service station.


An industrial area outside of Nijmegen was promoted to Area 51. Niels connected his palmtop computer to the MegaSquirt to make datalogs while riding: every single behavior of the engine is recorded.

You can see that the bike is eager to ride.


If I say 'every single behavior' I mean 'every single behavior'. To get the picture: the battery voltage, the exhaust gas, oil-, water- and air temperature, the throttle position, the air pressure, the ignition, injection, the wastegates, the fuel pumps, the crankshaft position. Traction control and NOS control will follow.

Click the picture to view an animated datalog.


Voor het weergeven van de inhoud op deze pagina is een nieuwe versie van Adobe Flash Player vereist.

Adobe Flash Player ophalen


What is it like, riding your V8 for the first time after eight years? Hard to describe: this bike is twice as heavy as my GSX-R, has a multitude of horsepower and torque, runs with deceptively low revs at high speed. Did I mention the acceleration? And finally that sound. Look (and above all: listen) yourself.

Press the play-button to start the movie.


"Is the bike ready? Can it hit the road?" Well no, it can't. This first testrun supplied us with loads of data.

Niels literally experienced that the heat problem 'is not yet fully resolved' (to say it gently). You can see a burn mark on both trouser legs...

So there is still much work to be done. But the fact is: it's a bike, and it runs!

Read the next episode here.