|
The handlebar is one of the most noticeable and laborious parts of the motorcycle.
It has undergone some radical changes in its five years.
|
 |
|
|
|
|
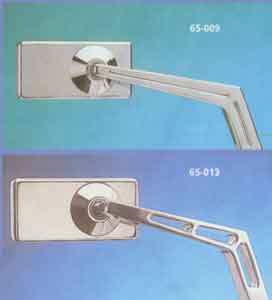
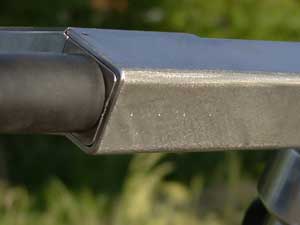
The handlebar: straight, angular, stainless steel and all cables smoothed away. The master cylinder reservoir has been incorporated into the handlebar as well. The turn signal indicators are located at the end of each grip. All parts have been worked out accurately in the 3D-program Form*Z; an absolute neccessity. |
|
 |
|
|
|
|
|
|
|
'In real' it's straight as a line. And heavy too: just over 14 pounds. |
|
|
|
|
|
|
|
|
|
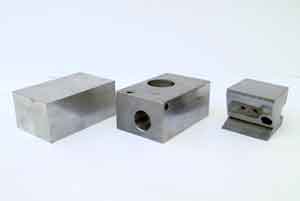
Where does all this weight come from? Parts of the brake and clutch have been milled from massive blocks of stainless steel by Percy Buurman. |
|
|
|
|
|
|
|
|
|
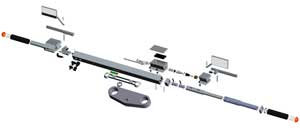
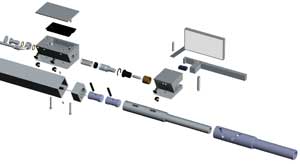
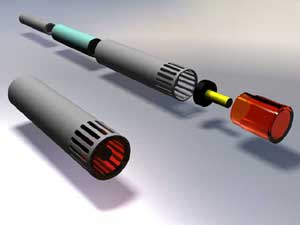
Though it looks simple from the outside, it is definitely not. Many original concepts didn't make it. Here you can see the first concept in 'exploding view'.
Click for an enlarged view of the image. |
|
|
|
|
|
|
|
|
|
The clutch. The switch for the turn signal indicators are located on the left, the horn on the right.
The mirrors and switches disappeared after the rebuild operation (see below). |
|
|
|
|
|
|
|
|
|
Operating the clutch is tough because of its short stroke. The cable is lead into the handlebar by a special teflon conductor. |
|
|
|
|
|
|
|
|
|
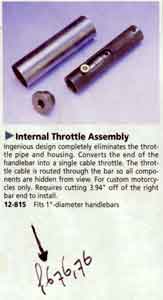
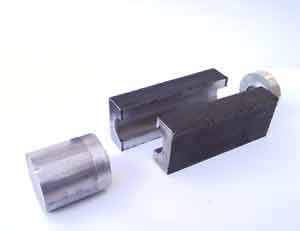
The front brake and the gas handle's design is far more complex. No cubic centimeter in the handlebar has been left unused.
In the handlebars a tube with slanting trenches is located. Turning the gashandle seperates two small cylinders, which for their part pull the gas cable. Here you see two experiments with PVC to field-test the idea. |
|
|
|
|
|
|
|
|
|
It subsequently turned out that someone had already invented something like this ... Harley Davidson, for crying out loud. My version however is far more advanced ;-) |
|
|
|
|
|
|
|
|
|
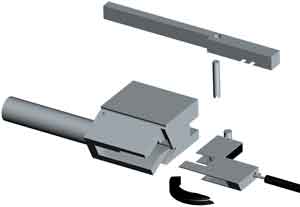
The brake has been built around a GSX-R 1100 brake rebuild kit.
Click for an enlarged view of the image. |
|
|
|
|
|
|
|
|
|
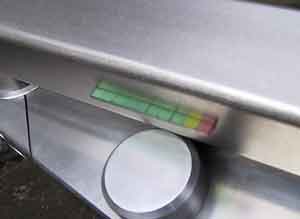
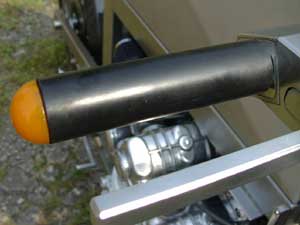
Located at the center of the handlebar: the electronic tachometer. Eight green, a yellow and a red LED. When all are on, the engine runs at 10,000 rpm. The last green led also serves as a neutral indicator, the red one as an oil pressure indicator and alarm indicator.
Simon Olyslager helped me out many evenings building all the wiring. |
|
|
|
|
|
|
|
|
|
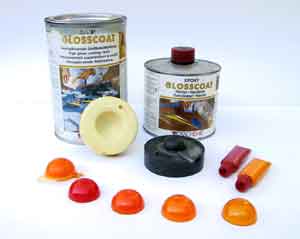
The indicators have been moulded in 2-component epoxy casting with color pigment. A doorknob served as an outside shape for the mould, a NinjaTurtle-marble as an inside shape. A lot of small experiments preceded the final indicators, to get the right color and transparency proportion. |
|
|
|
|
|
|
|
|
|
Grips are always fitted with a structure: ribs, bumps and fringes. Anyways not plain, so it's not suitable. So I made a mould in which rubber is heated under pressure. |
|
|
|
|
|
|
|
|
|
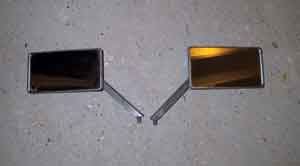
I still had to come up with something for the mirrors. Couldn't find anything useful anywhere: too busy and too expensive. |
|
|
|
|
|
|
|
|
|
So once again: make it yourself. |
|
|
|
|
|
|
|
Between September 2000 and June 2002 the CBX INOX has been rebuilt drastically; so has the handlebar.
|
|
You'll find more information about the mirror alternative (the camera system, that is) by clicking here. |
|
|
|
|
|
|
|
|
|
Right from the start I wanted a clean, rigid bike. No fuss, so better no switches at all. The CBX INOX already missed a kill switch, a headlight switch, a dimmed headlight switch, a pass switch and a starter switch. But there was no getting away from two ugly ones: the turn signal switch and the horn switch. |
|
|
|
|
|
|
|
|
|
And there were about to come even more switches because of the camera system. Until I hit upon a simple though effective idea: switches in the handlebar, the tank cover and the headlights, operated by small magnets in the glove. Four out of ten (!) magnet switches are installed in the handlebar. |
|
|
|
|
|
|
|
|
|
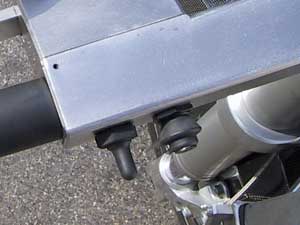
Tiny dots reveal the magnet switches' exact spots. |
|
|
|
|
|
|
|
|
|
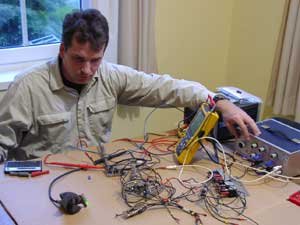
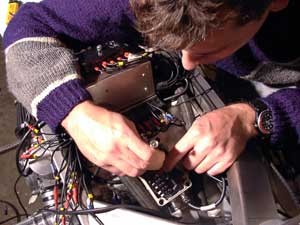
Lots and lots of elektronic parts were involved, months of trial and error. I myself had little experience with this matter, and even for Jan van Atteveld it was years ago. Testing, changing, soldering, mounting components and even more testing. A hell of a job.
Here you see Jan on a rainy winterday struggling with calculator, scoop, power supply, seven prints and lots of relays. |
|
|
|
|
|
|
|
|
|
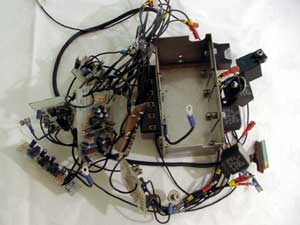
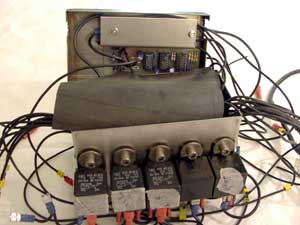
Here an impression of the prints' complexity.
Click for an enlarged view of the layout. |
|
|
|
|
|
|
|
|
|
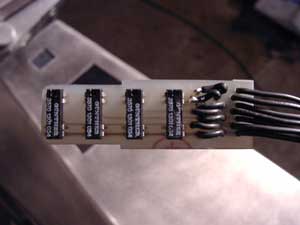
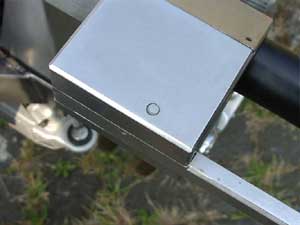
The prints had to fit in a stainless steel box as compactly as possible. |
|
|
|
|
|
|
|
|
|
Miraculously I succeeded. |
|
|
|
|
|
|
|
|
|
The box was installed before the gas tank and connected to the bike's many new cables. |
|
|
|
|
|
|
|
|
|
The wiring diagram of course had to be changed drastically.
Click for an enlarged view of the wiring diagram. |
|
|
|
|
|
|
|
|
|
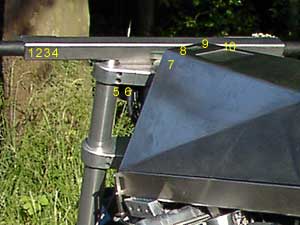
There are no less then ten magnet switches hidden in the bike:
1. Left turn signal indicator.
2. Right turn signal indicator.
3. Switching from left to right camera.
4. Horn.
5. Dip beam on - off.
6. Main beam on - off.
7. Starter.
8. Mode switch speedometer.
9. Reset switch speedometer.
10. Alarm on - off. |
|
|
|
|
|
|
|
|
|
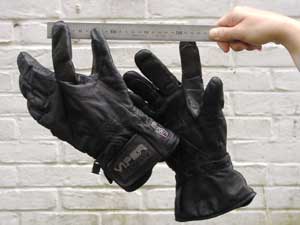
For operating the magnet switches the left glove has a magnet in its thumb and index finger, the right glove has a magnet in its index finger. |
|
|
|
|
|
|
|
|
|
July until November 2003 I initiated 'Stage III': radical and less radical changes combined with necessary maintenance.
The former grips were made of rubber: no more! I designed stainless steel ones, with integrated indicators: this made them less vulnerable and, moreover, the handlebar is now a complete stainless steel bar. |
|
|
|
|
|
|
|
|
|
The slots in the final versions of the grips were 5mm wide; 3mm wide slots meant breaking a lot of fraises.
Aim at the picture to view the new grip. | |
|
|
|
|
|
|
|
|
Not as striking but important as well, is finishing the handlebar's old (and useless...) mirror holes.
Aim at the picture to view the result (clutch side). | |